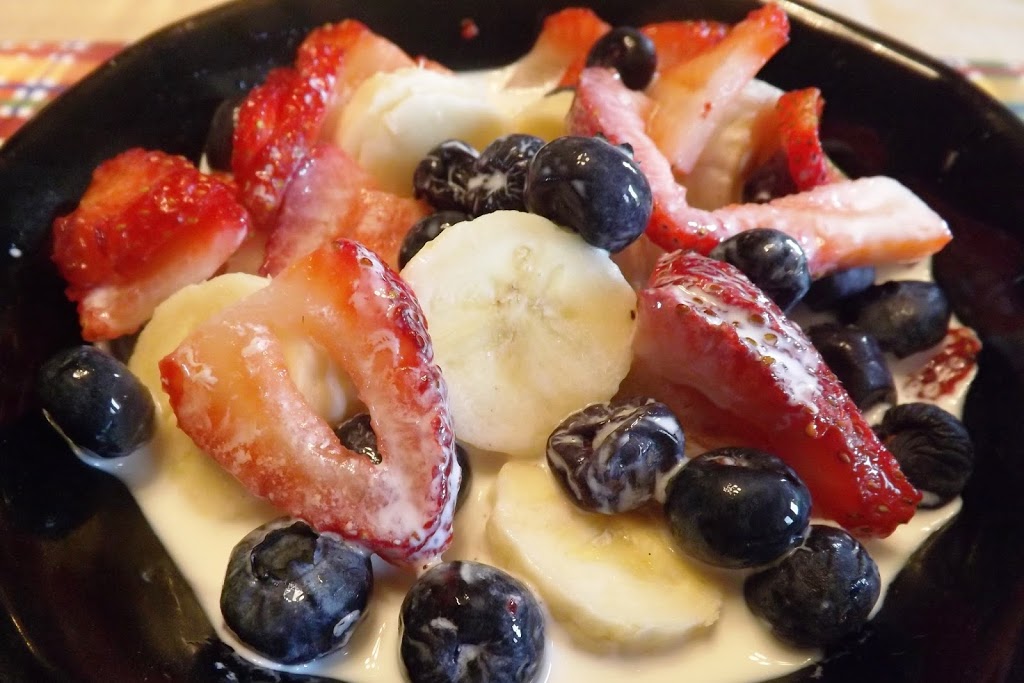
A Decadent and Classic Breakfast! (Fresh Berries and Cream)

Berries and Cream

Serves 1

1 banana, sliced
1/2 cup strawberries, sliced
1/4 cup fresh blueberries (although frozen and thawed will work)
3 tablespoons heavy whipping cream

  1. Combine all ingredients in a bowl
  2. Stir together. 
  3. Enjoy!
Nutritional data:
Calories:       288
Fat:            15.8g
Sat fat:       10.6g
Chol:          60mg
Sodium:   17.4mg
Carbs:        38.7g
Fiber:           5.6g
Protein:        2.1g
A word about this breakfast:
When I was growing up (back in the 60’s), I remember staying with a relative for a few weeks. It was a dairy farm and the meals were laden with fresh whole milk, butter, and of course, cream. My Aunt Ruth made me a breakfast that included a dish similar to what I have here (except the cream was freshly dipped from the bulk tank. That stuff is rich!) 
We never had cream at my house growing up, because my parents were always calorie conscious, and cream was just not part of the plan. I never ate a meal like this again, until last summer, when my wife and I were on vacation. One of the B&Bs served this for breakfast. The memory stuck with me, and I decided to share this exceedingly simple recipe here.
Many people who are trying to lose weight immediately start using low fat/ no fat versions of food, thinking that ridding fat from their daily menu will be the secret of weight loss. And that can work. But it is only one method. The likelihood is that most of my readers will have fruit in their house, but will not have “real” cream. 
This recipe uses heavy whipping cream, but only 3 tablespoons. If you haven’t had a breakfast like this, the cream is thick and rich. It clings to the fruit, so that you only need a little because you will get some cream with every spoonful. The richness of the cream and the inherent sweetness of the fruit eliminate the need for any added sugar. It is also rich enough to fill you and satisfy your hunger for longer because of the fats.
If this recipe scares you, you can use half-and-half, and you will save 95 calories, but you will lose the flavor and texture that heavy cream brings to this meal. So, if this recipe scares you a little, go to your local market, buy a half-pint of heavy cream and try it. Push your boundaries and discover other tastes that you maybe thought were unavailable.
This also makes a killer dessert after your evening meal.
You can vary this recipe and use any ripe fruit or berry that you like. Enjoy!

I NEED Your Help!

It is official!

Based on this blog, I was asked to participate in a local Saturday morning news show (Good Day, Wisconsin) on their Cooking with You segment. It is scheduled for Saturday, August 17, 2013.

Another item from the bucket list:
Cook live before a television audience. Done!

There are two segments, each three or four minutes long. I need two different recipes. The format is pretty concise. I will quickly demonstrate the ingredients and processes (but not acutally prepare the entire recipe) and then show a finished product, which the show anchors and studio crew get to eat after the show. (Go ahead and watch a few of the recorded segments in the above link so you can see a representative example.)

I need recipes that:
Don’t involve grills.  (Darn.)
Are “relatively” easy.
Are different.
Are fun.
Are colorful (hopefully) and visually appealing (definitely.)
Are from the blog.

I can (and will) go through the blog and look at the recipes, but I might be a little too emotionally tied to the recipes. I an asking for your help.

What recipes really spoke to you?
What recipes made your mouth water, made you go out and buy the ingredients, made you go “Whoa!”
What recipes do you think are both easy enough and yet would benefit from a quick visual demo?
What recipes are different, and yet not “weird?”

If you live in Northeast Wisconsin, you will be able to watch me live on Green Bay’s Fox 11.  The first segment is at about 7:50am and the second is at 8:50am and ends the show. (The host has also offered to promote the blog.) If you don’t live locally (and why not?) I will post links to the segments as soon as the station posts them.

So, I am giving you an important assignment: 
My readers are my “test market.” You are the people that I want to connect with through the blog and on TV. You all have opinions and ideas (and I have learned enough to know that listening to others is a great way of gaining a deeper understanding.)

Please tell me your ideas of the recipes here that fit my requirements above. I’ve already received a few ideas from Andrew Carpenter (thanks for the ideas!) In the comment section below, give me one – three ideas. On Friday July 26, I will narrow the list down to three to five. Over the weekend, I will make them again (if I haven’t made them recently) and post the pictures for your final voting. Then I will use the next two weeks to practice, practice, practice.

I am excited. But I’d be lying if I also didn’t tell you that I have a few butterflies of panic fluttering in my stomach. They almost certainlay will calm as I get closer and know what I will be preparing. It is just the unknown.

So, please help!

Top 8 Blogs That Have Influenced Me And Keep Me Going

This is a minor change in theme for a day. I want to acknowledge some people and groups that have helped shape me into the person I am. For now, I am not going to talk about apps and devices (let’s save that for a future blog post) but about people who are also blogging.

I am not the only blog out there! (I know, surprise?) Many of my recipes began as ideas coming from other places. I have found ideas in cookbooks and magazines, from friends and relatives, dining in restaurants and my wife has found some on Pinterest. I generally don’t make any recipe exactly as I find it (unless I am trying to duplicate Julia Childs). I usually look at the recipe, consider it’s appearance and ingredients and then make my own, in the spirit of the original recipe.

But I also read these blogs and they have helped me grow personally and as a blogger. I thought that I needed to give them full credit for their assistance and suggest that you might want to take a look at them, too. (But please don’t stop visiting me! We are almost getting to be like family!)  Please note that these are not listed in any specific order, neither alphabetical nor preferential.

  1. Danica’s Daily:  Danica Pike loves food–good food–and following the Weight Watchers plan has lost over 55 pounds. She focuses on living healthy by eating well. She has a very professional blog, and has been blogging since 2009. She offers life tips, recipes, food reviews and menus. She also writes about her travels, and was published in CharBroils “America Grills” cookbook. The pictures of her foods are wonderful, and I aspire to someday be as skilled. 
  2. Snack Girl: Lisa Cain has a Ph.D. in Evolutionary Biology, who over time became obsessed with the effects of food on health. She, and her husband Matt, believe in fresh food. and real food is the basis of good health and good living. Lisa also uses the Weight Watcher plan, and has her recipes categorized by both description of the food and the PointsPlus that each has, making searching very efficient. She also provide weight loss tips and suggestions on snacks that are healthy, even if they are packaged. If Lisa suggests it, I am convinced that it is a good choice.  
  3. In the Kitchen With Kath: Kath Dedon is a wonderful blogger and has been blogging since December 2009. Like me, she is her own photographer. Unlike me her photos are absolutely mouth-watering. (My photos are good, hers are great.) Her recipes are easy to follow and step by step (you wonder where I learned that from?) The subtitle to her blog really says it all:  “Old favorites…New discoveries. Fresh and easy!” 
  4. Greatist: In contrast to the first three, Greatist is not a single person, but a collection (I like to throw around big words, so here is one–it is an aggregator) of information from all around us. The staff and contributors are experts in their fields and therefore this one site can provide expert information in many areas. Their banner states “Fitness, Health, Happiness” and those are wonderful goals. Of course, I use the site mostly for food (well, what else?) and was the original inspiration for my Kimchi. As a nurse, one specific fact that really makes me trust this site is that if they state that XYZ is a fact, they have a PubMed reference and the fact is verified and expert vetted. They don’t throw “garbage science” out as the gospel truth.
  5. Spunkisuzi: Suzi hails from Canada and started blogging in June 2008, as a way to maintain motivation and increase her own accountability in her weight loss plan (sound at all familiar?) She talks about life in general, and posts pictures of her healthy and delicious-looking meals. She also wears a Fitbit, is a Weight Watcher, and from what I can tell, lives a pretty darn nice life.
  6. Lifehacker: This source is another non-single-person blog, and another aggregator of general knowledge. Lifehacker covers everything from personal finance, to apps and technology to (of course) foods, recipes and cooking ideas. The extent of information at Lifehacker defies description, and this short paragraph does not do it justice. Go take a look for yourself.
  7. We Beat Fat: This is a husband and wife (Angela and Willie) team who document the course of their weight loss journey. While they are still working on their ultimate goals, from January 2011 2013 February 2013,Willie lost 300 pounds and Angela lost 200. In the process, they have reinvented themselves. They are now runners and live a healthy life. They did not do anything extreme. They learned how to change their life and live on the correct amount of food, and they learned to move more. (Have you heard that before?) The blog continues to show their progress, shares favorites recipes and gives good weight loss tips.
  8. Grill Talk: Fabienne opened her own custom mixed perfume company in 2006. To do that, you need a sensitive sense of smell. If you know anatomy and physiology, that means you will also have a sensitive palate of tastes. When you enjoy the aroma and taste of food–well, I think we all know where that leads, and in 2011 Fabienne realized it was time to lose some weight. She focuses on eating the correct amounts of healthy foods and loves to grill because the heat of grilling brings out and intensifies flavors (remember, she has a palate with a Ph.D. in taste!) She also writes about non-food life observations and has a very well-rounded blog. The subtitle to her blog is “Healthy, Fast, Succulent”. Who wouldn’t want to eat that?
I appreciate everyone who reads my words, but I also appreciate those who write the words that I read. If you have a minute, check out one or more of these blogs and websites. And if there is a blog that you know about and you think I need to read, leave me a comment here with a link. I will look at everything! I have lived long enough to know that I can learn from anyone, and I should listen to everyone.

A Busy Week!

Sorry that yesterday’s blog post was so long. The recipe had several steps and I wanted to include pictures at the various stages.

I also wanted to show you how to make minor modifications to other recipes. It is relatively easy to create good delicious foods that will fit in your calorie budget. In almost any situation, it is possible to reduce the fat and sugar in a recipe and still create a delicious end result. In the case of that cake, it was unbelievably moist as a result if swapping the oil for applesauce.

It has been a hectic week here at home. Our eldest son stayed at college all summer, working for one of his professors as a research assistant, and in addition to that, he is preparing to spend a semester abroad in the fall. That entails a lot of planning and organization. Yesterday, our youngest moved into his own apartment (with a fair amount of help from us, naturally.)

Hello, “Empty Nest!”

Well,  not quite empty. We still need to move some of his stuff out. Possibly by the weekend. And then….we will finally have a room dedicated to be our office!

More on that as it happens!

Thanks for reading. Keep coming back to see what is next!

Another Short Poll–One Day Only

The first poll was pretty conclusive, with 87% of respondent choosing the shorter digital ebook sooner rather than a traditional print book later.

I want to explore a little more:

  • My book will be an ebook which will be readable on any digital device: Kindle, Nook, iPod/iPhone/iPad, other tablets, and downloadable to your computer. That way there will  be no impediment to reading it simply because you don’t have the right machine.
  • The book will be approximately 40-50K words. If I put that on paper, single-spaced in 12 point size font, that would be 100-125 pages, plus there will be another 20-25 pages with recipes and full color photos. 
  • As for the content, the focus will be how to stay on track to reach your weight loss goal. Some content will come from LoseIt posts, some from previous blog posts, and some will be original content that no one has read yet.
  • When this is published, I will make it possible to read 10% of the book before you buy it so that you know that what you are buying will meet your needs.
So here is today’s poll question:
How much would you pay for that book?
1.  $0.99-2.99
2.  $3.00-5.99
3.  $6.00-8.99
4.  $9.00-11.99
5.  $12.00-14.99
6.  $15.00-$19.99
7. You think it is worth more than $20
I already have a an idea in mind, but I am curious about your opinion, because I value your opinion.
This poll will only be open for 24 hours (closing Thursday, July 25, at 1pm Central Time.)
After this poll, I will get back to excellent recipes and some motivational blah-blah posts!

Garlic-Olive Oil Paste for Steaks

Garlic Paste (it really isn’t a paste, but it isn’t a sauce either.)
Enough for a 1.5 pound steak

2-4 cloves of garlic, peeled and roughly chopped (I used 2 large cloves)
1 tablespoon olive oil
1 teaspoon coarse salt (Kosher or the type you would need to put in a grinder)

Optional: 2 black pepper corns
               1-2 teaspoon fresh rosemary leaves
               5-10 whole coriander seeds (I used 10)

Special equipment: Mortar and pestle

This holds about 12 ounces (360ml) and I think this is as small as you should buy. I wish that I had a larger one. We’ll see. I bought this at IKEA for about $10. It is heavy marble, and has a very smooth exterior and a slightly rough interior. The marble makes it very easy to clean.

Peel and roughly chopped the garlic, and place it and the salt, and 1 teaspoon olive oil in mortar (and the optional ingredients if you are using them).

With the pestle light crush the garlic chunks a couple times with an up and down action.
Then, holding the mortar tightly in one hand, grind the ingredients in a continuous circular motion, twisting it occasionally to pull the material under and between the mortar and pestle.
After about a minute of grinding.
Note: you need a mortar that holds at least 1 cup. If you can find one that holds 3 cups, it will be easier because the pestle will be larger with a larger grinding surface.
The goal is to mash the ingredients into a relatively uniform paste.
When you have a nice texture, add the rest of the oil. (If you add all the oil at once  before grinding, the garlic tends to float around and it is much harder to grind it.)
That’s it.

The salt in here is necessary, because it acts as small grinding stones within the mash mixture. You also need a mortar that is light rough on the inside. I have seen some that were as smooth on the inside as on the outside. That would make grinding much more difficult because the roughness grabs the material and briefly holds it while you work out your day’s frustrations.
The whole process will only take a couple minutes.
Don’t forget to add the oil to your log. If you have three portions of meat, is is 40 calories of oil ,four portions is 30 calories of oil. 
This thin paste can be used on steaks of any sort, but I like using it on beef flank steaks, as they are relatively lean and benefit from having some added oil. I also use it on my pizza crust in place of a tomato sauce.

Preparing a flank steak takes a few additional steps.

Do you see the muscle fibers running from the lower left corner to the upper right? That is the “grain” of the meat, and when you serve a steak like this, you will slice it into 1/4 or 1/2 inch slices across the grain (moving the knife from upper left to lower right, in this picture) when you plate this meat for your dinner guests.

To help further tenderize the meat, before adding the garlic-oil paste, score the meat. Using a VERY sharp knife, cut a series of 1/4 slices into the meat, parallel and 1 inch apart, at about 45 degree to the grain.

Then, cut it again, on the same side, but at right angles to the first cuts.

Flip the steak over and repeat the process on the other side. Then, rub the garlic-oil paste on both sides.

At this point, you can pause our dinner prep. You could do all this even a day in advance. Just wrap the meat in plastic film and refrigerate, and it will be ready as soon as the grill is hot. Using an oil paste like this will help keep the steak juicy and tender.

When ready to grill, preheat the grill on high for at least 5 minutes (gas grill) or let the charcoal burn down to gray embers. Brush the grates, and using tongs and paper towel, carefully rub vegetable oil on the grates to help prevent the meat from sticking.

This steak cooks quickly.  It is generally an inch thick at most, and when you criss-cross cut 1/4 inch on both sides, you open up a lot more cooking surface. (See how the heat opens the cuts?) About 4 minutes per side will be medium.

Last night, I accidentally let it go a total of 9 minutes and it went to medium-well. (When cooking something that goes so quickly, don’t get sidetracked watering your herb garden.) For us, that was a disaster. An edible mistake, but not one that I will commemorate with pictures. (We like our steaks medium-rare, which is about 6-7 minutes total cook time.)

Nutritional data?  Depend on the size of the portion, and the exact cut of steak. The paste is enough to cover a 1.5 pound steak (above). I generally cut a flank steak into four ounce portions, so I can get about 6 servings per steak (many fewer if both of our boys are eating with us.) A four-ounce portion would have about 20 calories added from the oil.

———————————

Poll results:  87% of respondents preferred the idea of a shorter ebook available sooner.

An new poll will be out later today, to further refine that idea.  THANK YOU for helping me with my next projects. I hope that you will be as satisfied with them as you are with this blog.

Asian Chicken Salad

Asian Chicken Salad
Serves 2

Remember Last Friday’s recipe? The Grilled Chicken and the Hoisin BBQ sauce?

Well, this recipe uses 2 left over chicken quarters and the remaining Hoisin BBQ sauce.

Skin the chicken and remove the bones. Roughly chop the chicken. Pour the BBQ sauce over the chicken and stir to coat. Warm in the microwave until it reaches the temperature you want.

Make a salad on a base of thinly sliced Napa cabbage (yes, the same as in the Kimchi recipe.) On the bed of Napa, add your preferred vegetables:

  • Peeled, seeded and chopped cucumber
  • Shredded carrots
  • Chopped bell pepper
  • Onion (white or green)
  • Chiles
  • Snow pea pods
  • Mushrooms
  • Bean sprouts
  • Bamboo shoots
  • Water Chestnuts
Think of your favorite Asian dish. If you liked the veggies in it, you will like it on the salad.
Top your veggies with half of the chicken/BBQ mix. If you want more dressing, you can use your favorite Asian-style salad dressing, or simply make more of the BBQ sauce.

Since the calories and other nutritional data will vary based on what you choose and the quantities used, I am not going to give any nutritional data. Like any salad, the calories are concentrated in the dressing. Use as little as you can get away with, and you will have an full-flavored, low calorie meal, that uses up leftover chicken in a way that maybe you never considered.

Tuna BLT

Tuna BLT

I’m not going to give a specific recipe here. This is just a pictures to stimulate ideas. You can do this with any protein (beef, pork, chicken, turkey, or fish. You could even use a piece of tofu or a black bean burger.)

For this sandwich, I used about 4 ounces of ahi tuna. I heated a heavy-bottomed pan until it was really hot then seared both side for about 30 seconds. That tuna is about 3/4 inch thick.

The last time I posted a BLT, I used Healthy Life’s Whole Wheat English muffins. This sandwich was built on two pieces of their 100% Whole Wheat High Fiber bread. Depending on your personal focus, per slice it has 35 calories, 5 net carbs, 3g fiber, and only 85mg sodium.

Instead of mayo, I used mashed avocado as in the earlier sandwich. That drizzle in front is an excellent chipotle-infused olive oil from my friends at Olivada, in Sheboygan, WI. The smoky heat (but not too hot) of the oil nicely off-set the smoothness of the avocado and the meatiness of the tuna.

(No, I don’t get freebies, commissions or anything else. I just enjoy supporting small businesses that offer great products and great service. You can visit in person or shop online.)

No nutritional data today. The sandwich will vary based on your ingredients. I just hope that I gave you a new idea.

You have until 11:59pm on Tuesday to vote in the poll. I have a couple other polls that I will post after this one, to further refine my plans. Why am I polling you? It’s really for the same reason I do this blog. I want to create a product that you really want. I don’t want to spend a lot of time (and money) making a book that will only be of interest to my Mother. I want to satisfy your needs more than my needs.

Kimchi


Kimchi
Make 2-3 quarts

1 head (1.5 to 2 pounds) napa cabbage or green cabbage, cut into 2 by 1-inch pieces (reserve 2-3 large leaves, uncut). Note: You can also substitute bok choy in place of cabbage.
2 tablespoons kosher salt
3 large cloves garlic, minced
1 teaspoon fresh ginger, peeled and finely grated
1 teaspoon sugar (alternatively, use 1 apple or pear).  I used 1 apple, cored, but not peeled
3 tablespoons Korean chile pepper flakes or paste (gochugaru).  I used 1 tablespoon Sriracha sauce.
4 green onions, green parts only, cut into 2-inch pieces (optional, but I used it)
1/4 cup medium yellow onion, thinly sliced (optional, but I used it)
Optional:             a few large carrots, thinly sliced (I used this)
                           1-3 teaspoons fish sauce (I didn’t use this, to reduce the sodium content)

For extra hotness: add 1 chili pepper (doesn’t need to be gochugaru).  I used a dry Thai Birds-Eye pepper, shown in the foreground.
A three quart-size, sterilized mason jars (Place in boiling water, mouth down, for 10 minutes. Do this while you are preparing the garlic-ginger-chile paste.)

Yield: 1-3 quart-size jars (I made 2 quarts from a 2 pound head of Napa cabbage.)

What to Do
Wash all vegetables and premeasure all of your ingredients so you have them ready to go. Set aside a few large cabbage leaves (to be used at the end of the process).

Place the rest of the cabbage in the large bowl and sprinkle with 2 tablespoons of kosher salt. Toss to combine. Cover the large bowl and allow its contents to sit at room temperature until the cabbage has wilted (expect this to take a minimum of one hour and as many as 12). As it wilts, the cabbage will release around a 1/4-1/2 cup of liquid. (To speed the process, place a plate on the cabbage and then put a weight on the plate. A gallon jug of water works perfectly.) Remember this could take as many as 12 hours, so give it time if it needs it! I think leaving it the full 12 hours under that plate created more juice and a better finished product.

Once the cabbage has wilted, drain it, set the liquid aside,and pat the leaves dry.

After you drained the cabbage, combine the garlic, ginger, chili pepper, carrots (if you’re using them), and sugar (or the apple or pear, if using) in the food processor or blender.


Process the mixture until it forms a rough paste (around 30 seconds if using a food processor or blender). Be sure to scrape the container’s sides as needed.

Thoroughly mix the cabbage with the paste. This is your basic kimchi mixture.

Pack the kimchi into the mason jars (try to avoid air pockets). Add equal amounts of the reserved cabbage liquid to each jar, making sure that each jar has at least an inch of head space (If needed, add some water to the jars to make sure the kimchi is completely covered by liquid.). Press the mixture down firmly using the wooden spoon, so that the brine covers the top.

Cover the top of each jar with one of the reserved large cabbage leaves.

Seal the jars loosely. (If you seal them tight, they will eventually explode.)  Let them sit at room temperature (65 to 75 degrees Fahrenheit) for three to five days. Taste the kimchi every few days; it will be ready when it has developed a sour, spicy taste and a texture resembling that of sauerkraut.  (I found that 7 days at room temperature was perfect. Also, I was out of town on days 3-7 so I didn’t really have an option. Fortunately, fermented foods are forgiving.)


When the kimchi is ready, remove the big cabbage leaves from the top of each jar and store the jars (tightly sealed) in the fridge. The kimchi should keep for several months.

Nutritional data: (1/4 cup, drained)
Calories:          17
Fat:                0.1g
Sat fat:              0g
Chol:              0mg
Sodium: 117.3mg
Carbs:               4g
Fiber:             1.3g
Protein:          0.7g