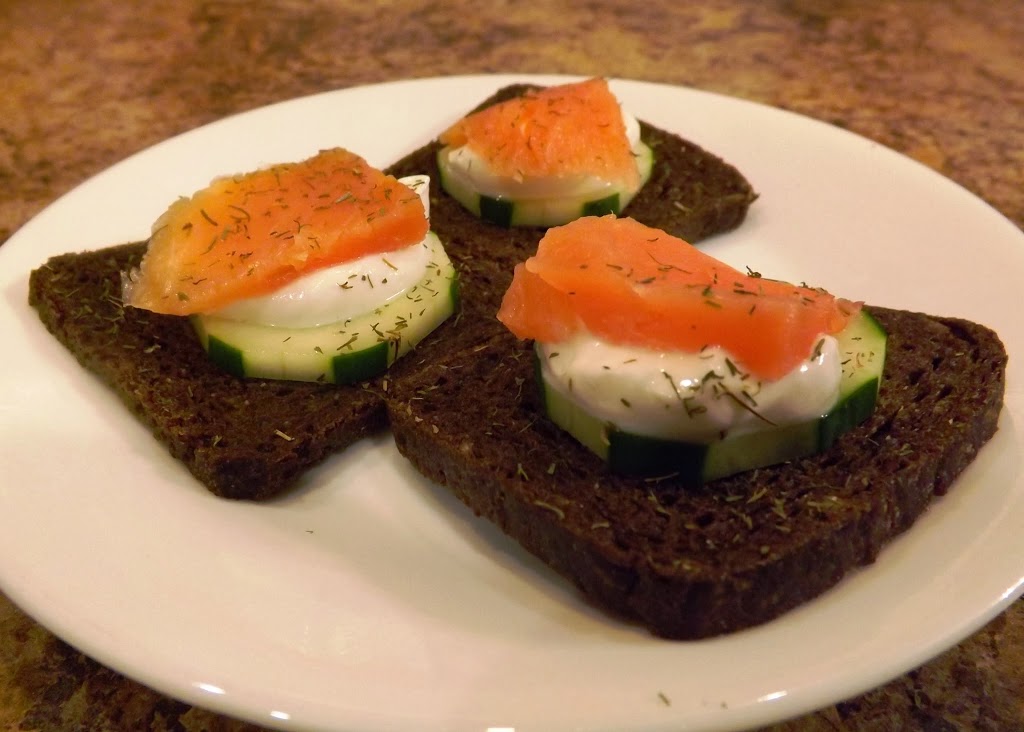
Smoked Salmon, Cucumber and Yogurt Bites

Smoked Salmon Cucumber and Yogurt Bites
Makes approximately 30-40

1 loaf cocktail rye bread (2″ square slices)
1/2 cup plain Greek yogurt (non-fat, if you want, which is what I had on hand)
1 -2 cucumbers, peeled and sliced into thin wheels
Smoked salmon thinly sliced (you can also use Swedish gravadlax)
Dill weed

  1. Lay out the bread slices.
  2. Top with one cucumber wheel.
  3. Top with 1 teaspoon yogurt.
  4. Add small slice salmon (1/4 ounce).
  5. Lightly sprinkle dried dill.
Nutritional data (per piece):
Calories:       45
Fat:            1.1g
Sat fat:       0.1g
Chol:          5mg
Sodium: 66.7mg
Carbs:        4.1g
Fiber:            1g
Protein:      3.5g

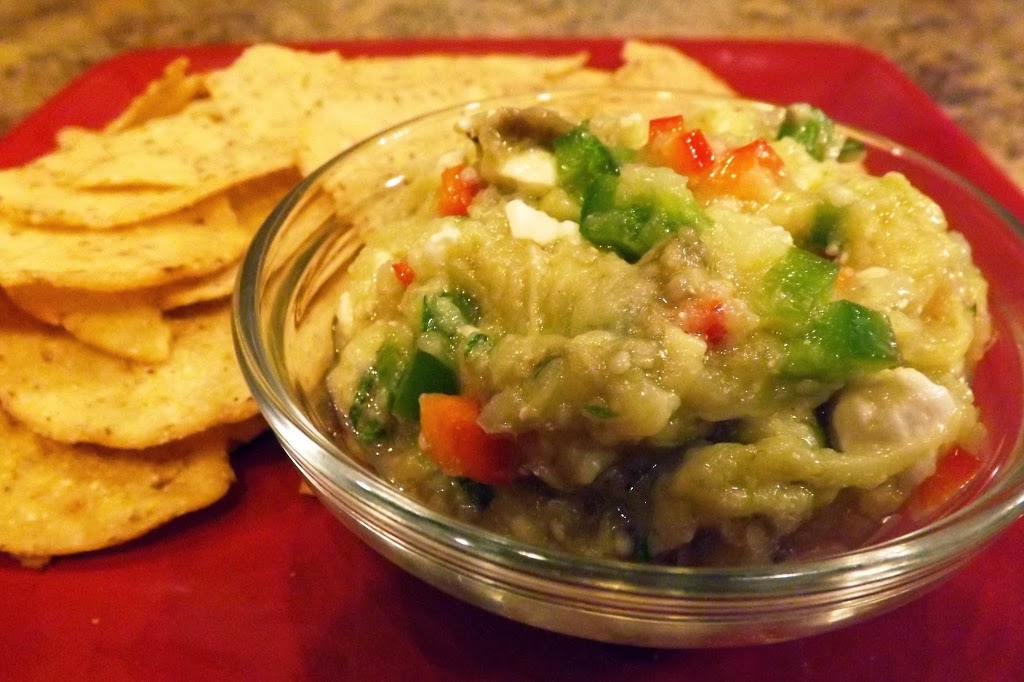
Roasted Eggplant and Feta Dip


Roasted Eggplant and Feta Dip
Serves: 24 (2 tablespoon serving)

Eggplants (enough to equal about 1 pound)
3 tablespoons olive oil
2 tablespoons lemon juice
1/4 cup onion, finely minced
1 jalapeno chili, seeded, finely minced
1/4 cup red bell pepper, finely minced
1/4 cup feta cheese

  1. Preheat the oven to 400F (or preheat the grill on high)
  2. Roast the eggplant (either method) turning every 5 minutes or so, until the skin begins to char the the fruit is soft.
  3. Remove and set aside to cool.
  4. When cool, slice and scrape into a bowl. Add oil and lemon juice.
  5. Mash with a fork until mixed but still lumpy.
  6. Add all remaining ingredients. Mix to combine.
Nutritional data:
Calories:        34
Fat:              2.5g
Sat fat:         0.7g
Chol:         2.7mg
Sodium:   35.3mg
Carbs:          2.7g
Fiber:           1.4g
Protein:        0.9g

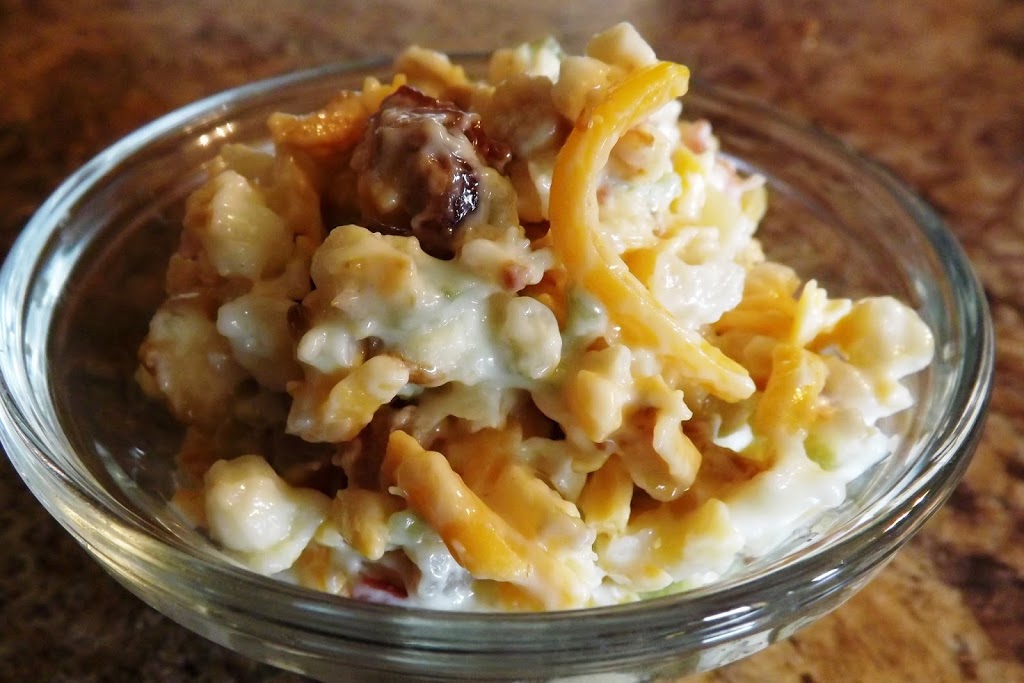
Bacon-Cheddar Popcorn Salad

Bacon-Cheddar Popcorn Salad

Seriously?

I saw this in the deli at my local grocery store. I normally don’t shop the deli, because there is little to choose from that meets our caloric and sodium menu plans. However, they had a healthier version of potato salad that I wanted to try. (I didn’t buy it. It was made with yogurt–which I like–but in this case, the recipe wasn’t very good.)

But as the deli worker was getting my sample of the potato salad, I saw a bowl of this salad. Here is a little how my brain went:

“Hm.  This potato salad is not very good. And I think I need to get…wait. Is that bacon?  And cheese?  And popcorn?  All together????”

I left the deli without potato salad but with a container of the Bacon-Cheddar Popcorn Salad in my cart.

It was really good. A definite ranch-ish flavor, built on fresh popped popcorn, a lot of bacon chunks mixed with shredded cheddar cheese and diced scallions, all in a mayo-type base.

I don’t have a recipe yet. And I don’t know if I want to toy with this. Maybe the secret will be to use this salad as a reward on rare occasions and just limit how much I eat. I don’t know. But it is fun to find such unique combinations of favorite foods.

Now, here is my question:

How can I make that recipe, but make it healthier?  (In other words, low sodium?) I can use low-sodium bacon (that is the bacon of choice here at home), but the cheese and mayo is sodium heavy. Would it be worth making my own mayo from scratch and leaving salt out?

You Can’t Do That! It’s Impossible! It’s Crazy!

“There is only one thing that makes a dream impossible to achieve: the fear of failure.” Paulo Coelho

For those of you keeping track (you know who you are!), today was day 7 of my Cold Shower challenge.

My what????

Joel Runyon, entrepreneur and adventurist, founded a company based on the idea that nothing is impossible and to reach their goals, people need to be willing to endure some discomfort on the way to success. Part of this is a challenge to take a 5 minute cold shower, every day for 30 or more days.

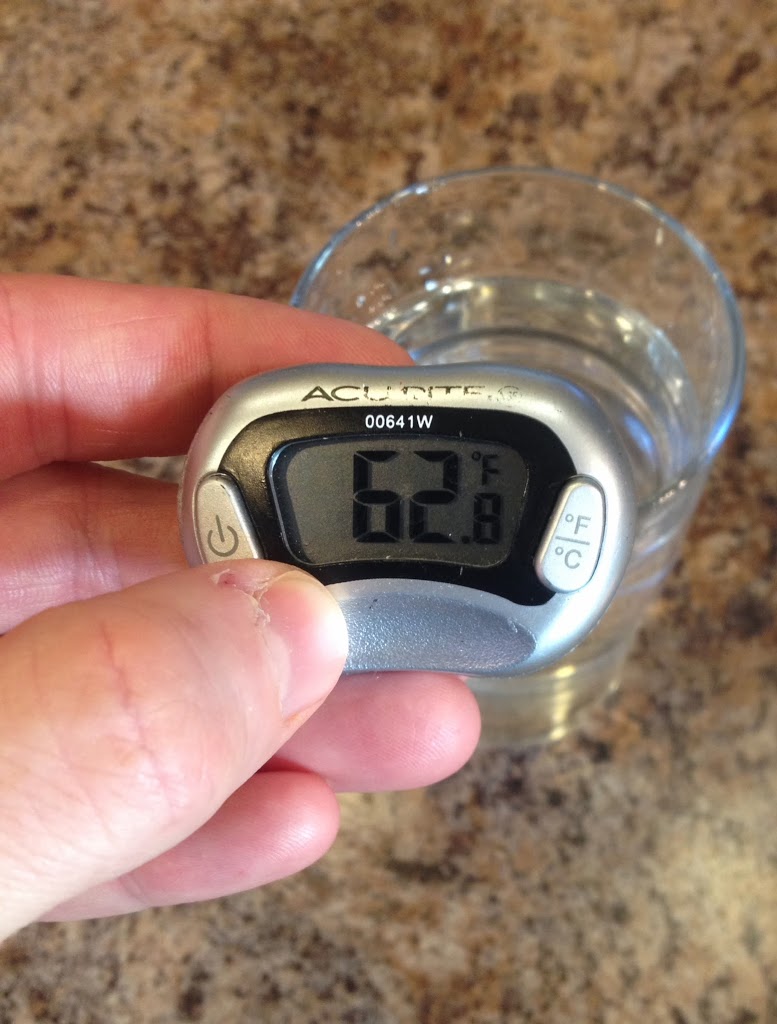
Yes. I know. I am crazy. That has long been established. Now that we have that label applied and out of the way, how do I survive the shower? I fire up my iPhone, get some music pumping, and turn the shower on cold. No hot water at all. (Currently, the water temperature is about 63F/17C.)  That’s the key. Start cold. Don’t start warm and then turn it down. Just get in and confront it. (I would say “Man up” but as a nurse educator, I teach my students to always be gender inclusive.) Climb in. The first 30-60 seconds are terrible. Seriously. It’s cold, but it burns, too. It will take your breath away. If the phrase “WTH am I doing????” doesn’t repeatedly go through your head, then you probably don’t have the water on ice cold.

Then what? Jump around (safely). Pump your arms. Shadow box your ice cold opponent. Maybe let loose a Norse battle cry. (Or whatever.) Do whatever you need to do to get through that first minute. Because at about that time, your mind’s voice gets tired of shouting obscenities at you, and your body starts adapting. It becomes less cold. It will never get warm, but it becomes tolerable. Really. That is not my hypothermic brain talking, you really will begin to get used to it.

Actual water temperature

It is cold. It is not impossible. In fact, it is incredible how you feel when you climb out, NEVER having turned on the warm water. I am energized! I think the reason hot showers are relaxing is that they sap energy away. Cold brings it on!

But it is not about the cold water. The cold shower is the merely vehicle through which you begin to train your mind and body. Enduring the cold is about making a decision to purposely do something that is uncomfortable. We all avoid things that we know are uncomfortable. We postpone writing that paper (or grading one.) We avoid the dentist or doctor. We decide to sleep in instead going to a walk/run.

Every time we make that decision to remain comfortable, regardless of the context, it makes avoiding discomfort easier next time. And sometimes, the discomfort is the price of success. Likewise, the longterm price of immediate comfort can be devastating (increased stress on the job from an ever-increasing workload, poor health, and weight gain.)

I tell my students that you cannot learn by staying within your comfort zone. Learning and growth occurs when we step beyond what we have already mastered and risk failing at something new. I try to “walk the walk” and lead by example.

We purposely eat less than we want and less than we have in the past (which causes some discomfort) and we exercise more (which may be major discomfort). However, because we voluntarily endured discomfort, we lose weight. If you are in sales, making cold calls can be very uncomfortable, but if you don’t do it, you won’t sell anything. No sales means no income and that can be even more uncomfortable! We stay up late into the night when we would prefer to be sleeping so that we can finish an important assignment. We are frequently given choices, and sometimes the temporary discomfort is the price we must pay for longer term happiness.

Avoiding pain and danger makes sense, but cold water isn’t painful nor is it dangerous. And it gives you the frame of mind that says “What else can I conquer today?”

Has it been a dream of mine to take cold showers? No! (What are you, nuts? I LOVE hot showers.) But I also want to grow beyond my current limits, and I want to help others grow, too. That WILL require me to step outside my comfort zone. I am training myself now so that I am mentally prepared for my future challenges. And we all experience challenges.

  • Why not start learning to face challenges head on, right now?
  • Why not show yourself that discomfort is temporary but conquering it is empowering?
  • What impossible challenge are you going to attempt today?

“The difference between the impossible and the possible lies in a man’s determination.” Tommy Lasorda

For more information, go to Joel Runyon’s website:
Here is another article reinforcing why you should try cold showers.
************
By the way, I learned of Joel Runyon and his Cold Shower Challenge on Meron Bareket’s “Inspiring Innovation” podcast #29 http://meronbareket.com/how-to-do-the-impossible/

If you haven’t listened to Meron’s podcast, you should give it a try! He interviews entrepreneurs who we may not have heard about (yet), and reveals their success stories, providing weekly life lessons that we can use to improve our lives and empower us to achieve greatness. (Yeah, I am a fan!)

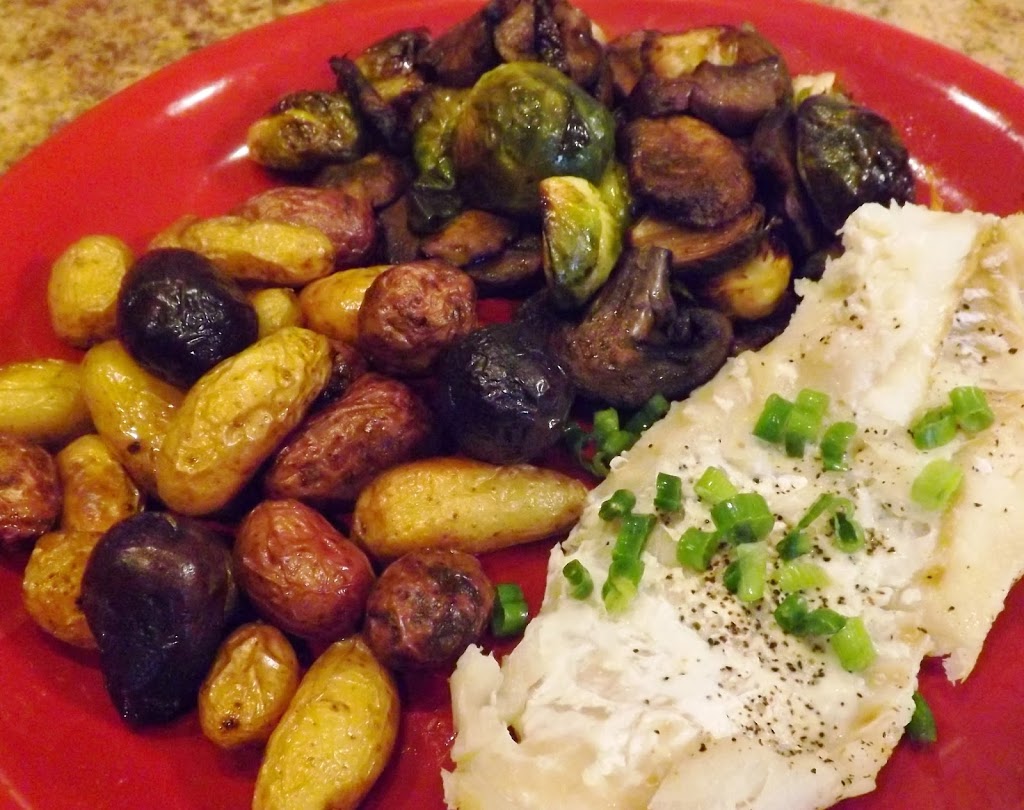
Roasted Brussels Sprouts with Mushrooms

Roasted Brussels Sprouts with Mushrooms
Serve 6

Served here with roasted fingerling potatoes and a baked Atlantic cod.

1 pound fresh Brussels sprouts (approximately) halved it they are large
1 pound mushrooms, any type, washed and sliced
4 tablespoons olive oil, divided
Seasoning of your choice (I used Penzey’s Sunny Paris)

  1. Preheat oven to 450.
  2. Place the Brussels sprouts in a large Ziploc baggies.
  3. Add half the oil and the seasoning. Toss to coat.
  4. Empty the baggie into a 9×13 pan or other roasting pan.
  5. When the oven is ready, place on top shelf.
  6. Using the same baggies, place the mushrooms in it.
  7. Add remaining oil.
  8. After 15 minutes, stir the Brussels sprouts and pour the mushrooms on top.
  9. Roast for 15 more minutes, stirring half way through.
Nutritional data (1/6 of the pan, approximately 1 heaping cup):
Calories:       145
Fat:             12.9g
Sat fat:          3.7g
Chol:        13.3mg
Sodium:    20.6mg
Carbs:           7.1g
Fiber:            2.5g
Protein:         3.1g

To roast fingerling potatoes, toss with 1-2 tablespoons olive oil and your preferred seasoning. (I used Penzey’s California Style Seasoned Black Pepper, which is black pepper, red and green bell peppers, onion and garlic.) Place in a roasting pan at the same time you start the Brussels sprouts, tossing them half way through. The potatos will be done with the sprouts and mushrooms.

To bake the cod, spread 1-2 tablespoon butter in a 8×8 or 9×13 baking pan (depends on how much you are baking). Lay the cod on the butter in a single layer. Sprinkle with pepper (and salt, if desired.) Place in the oven when you add the mushrooms to the Brussels sprouts.

The entire meal will be done at the same time.

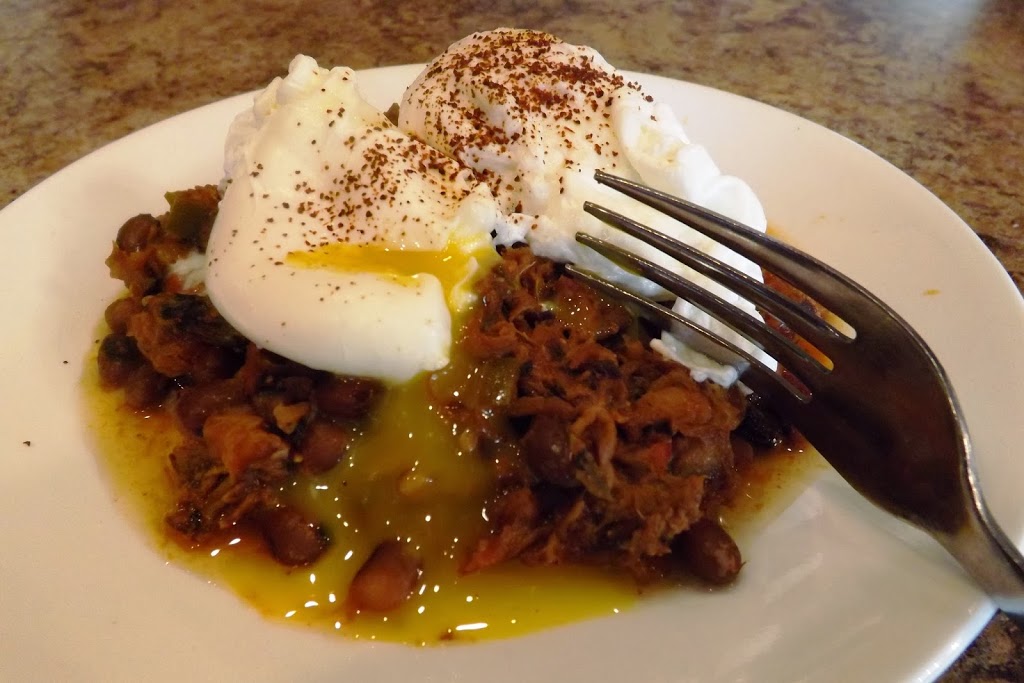
Poached Egg on Pulled Pork Chili

Poached Eggs on Pulled Pork Chili
A hearty breakfast for one

Pulled Pork Chili
Serves 8

8 ounces prepared pulled pork
6 medium tomatoes diced (or 2 cans diced tomatoes, undrained)
One 6 ounce can low sodium V8 (omit if using canned tomatoes)
3 cups kidney beans (I used dried beans that I cooked in my pressure cooker) You can substitute 2 cans.
1 cup diced onion
1/2 cup diced green pepper (sweet or hot)
Spiced and herbs to taste (I like Penzey’s Chili Powder

  1. Mix together in a soup pot. Heat until evenly warm.
  2. Serve alone or with other toppings like cheese, sour cream, and extra jalapenos.
Nutritional data for the chili (each serving is approximately 1 cup)
Calories:       235
Fat:               5.9g
Sat fat:             2g
Chol:        48.2mg
Sodium:       52mg
Carbs:          21.6g
Fiber:             5.9g
Protein:        23.7g

Note about the chili: this is a very simple and delicious recipe. You can alter the meats however you would like (chicken, beef, sausage, etc). I like to use this recipe as a vehicle for leftover meats. Or omit the meat altogether.

How to make a poached egg:
Bring 1 liter of water and 1/8 cup white vinegar to a rolling boil.
Turn the heat down.
Crack each egg into a small dish. Set aside. You will make one egg at a time.
When the water stops boiling, swirl the water until you get a small vortex in the middle of the kettle.
Gently and slowly pour the egg into the middle of the vortex. If done correctly, the whites of the egg will quickly thicken and solidify. (The vinegar helps speed that process.)
Cover the pot and let simmer for 4 minutes, and then remove with a slotted spoon.
Serve with toast, or as the topping for this chili. 

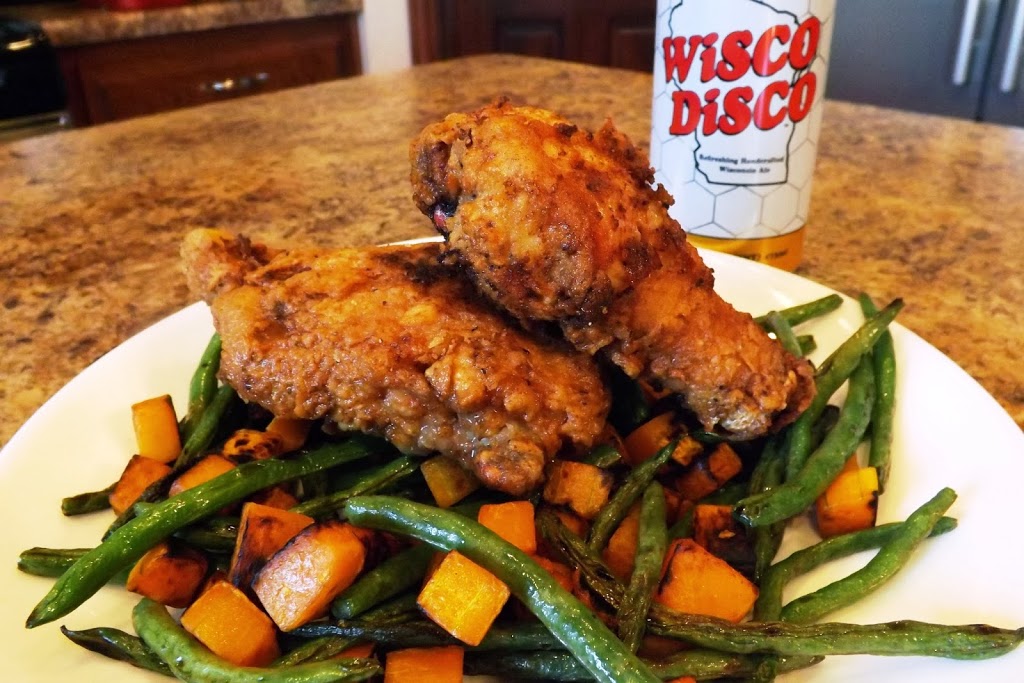
Fried Chicken with Sauteed Green Beans and Squash

Buttermilk Breaded Fried Chicken 
6 pieces
I have NEVER deep fried chicken at home before, only when I worked at a fast food restaurant 26 years ago. I don’t know why I have never done it. I will certainly do it again, because that chicken was incredible. The coating was crisp and crunchy, but it did not all fall off with the first bite and the meat was tender and juicy.
6 pieces of chicken (I used skin-on thighs and drumsticks)
1 cup buttermilk (I used low fat version) 
1 egg
1 cup whole wheat flour 
1 tablespoon corn starch (increases the crispiness of the breading)
Seasoning of choice (I used garlic and onion powder, and black pepper)
Oil for frying
  1. Season the chicken and let sit in the refrigerator for 1-2 hours.
  2. Pour buttermilk into medium bowl and add egg. Whisk together.
  3. Put flour, corn starch and seasoning into a shallow dish.
  4. With your left hand, pick up one piece of chicken and coat with buttermilk mix. Lay it on the flour.
  5. With your right hand, toss the chicken until it is completely coated with flour mix. Remove to a clean plate. (I really don’t care which hand dips into the buttermilk and which does the flour, but if you keep your hands separate, it won’t be a messy.)
  6. Preheat the oil in a deep kettle or stock pot. I used a large cast iron Dutch oven outside on the side burner of my grill. You want the oil to be 375F. If you have one, use a thermometer. How much oil depends on the size of the pan, but you need at least an inch of oil.
  7. When it is hot, carefully place 3-4 pieces into the oil, or as many that will fit leaving room between them.
  8. Turn them when they begin to get golden brown (3-5 minutes). Let the second side cook an equivalent time and remove to a cooling rack to let excess oil drip off.
  9. Serve! It goes well with a full bodied beer.
    The side dish is simply a butternut squash, peeled and cubed, with fresh green bean. I sauteed the squash in a tablespoon oil tossing frequently until just starting to get brown. Then I added the green beans (I didn’t measure or weight. Use at many as you want.) Again, toss frequently, and serve when the beans are hot.
    Nutritional data: per piece of chicken, with the skin on
    Calories:         270
    Fat:              16.5g
    Sat fat:           2.6g
    Chol:       115.6mg
    Sodium:       96mg
    Carbs:           7.7g
    Fiber:            0.5g
    Protein:          22g
    Note: Use that nutritional data with a “grain of salt.” Every piece of chicken can be a different size. If you remove the skin before eating, you will get less fat and cholesterol. If you use a salted spice, you will have more sodium. This recipe is more about how to do it, rather than about the exact end result.

Update on Oatmeal Muffins

A few weeks ago, I posted a recipe for Oatmeal Muffins that my wife made. I want to tell you about a few modifications that we tried which were successful. (See the earlier blog post for the specific baking instructions.)

We made the most delicious pumpkin muffins, by swapping out the applesauce for an equal amount of pure canned pumpkin. (Not pumpkin pie mix, but 100% pumpkin.)  We also added about 2 teaspoons of pumpkin pie spice (more or less to your preference.) If you do not have a premixed jar of pumpkin pie spice, it is approximately 4 parts cinnamon, 2 parts ground ginger, and 1 part each of allspice and nutmeg.

For those this recipe, you would need approximately 1 teaspoon cinnamon, 1/2 teaspoon ginger, and 1/4 teaspoon each of allspice and nutmeg. Vary to your preferences.

Then we tried a variation that I didn’t list on the earlier post. Instead of applesauce, I put 1 cup whole kernel corn in my food processor and processed it until it was smooth. Then I replaced half of the whole wheat flour with corn meal, and added onion powder, chili powder and chives. Incredible!

The next variation will be a cranberry muffin, using my fresh Cranberry Relish to replace the applesauce.

This basic oatmeal recipe is so versatile! And it is delicious, especially when warm from the oven. My wife, Tammy, did a great job when she found this recipe and mastered it!

Change is an Ongoing Process

If you want to change something, there is a defined process or set of steps. Everyone takes all the steps. Sometimes the time lag between steps is brief, and sometimes the duration of one step can be very long. Some people repeat a few steps, but every step is always part of the process. Since I–and many others–are in the “weight change” process, my examples will all refer to that decision.

Step 1: Pre-contemplation
At this point, you don’t even think about a change. Life is happening and you are riding along. You rarely consider your weight, because it is not interfering with anything. Changes only occur when someone decides that an improvement can be made. At this point, you are content.

Step 2: Contemplation
Something has happened. You had an “a-ha!” moment, and it might have been an unpleasant finding. Maybe you were invited to a nice event and when you went to try on your favorite slacks, you found that you needed to coat your legs with bacon grease (why do you have so much bacon grease on hand?) and stand on the dresser while your significant other holds them open so you can jump in. In my case, my blood pressure was up to the point where the Red Cross started deferring me from donating blood. And since I worked in an ER, and knew what happens to overweight guys with very high blood pressure, I suddenly saw the problem and realized the gravity of it. In this phase, you do nothing, but you understand that something needs to happen.

Me, at about 290 pounds, in July 2006

This is a step that many people linger on. It is easy to say “I need to…” but making the decision to do something and acting on it, is much harder. And scary.

Step 3:  Preparation
At this point, you have decided what to do and have started. This can be the most exciting step! You finally are addressing the problem and very often, you quickly see initial results. Maybe you join Weight Watchers. Maybe you join a gym. Maybe you buy a bicycle. But whatever you choose, you decide a course of action and begin. In my case, I found a diet plan (The Sonoma Diet) which was very Mediterranean and looked like I could do it. I started eating the Sonoma/Mediterranean way. And I started to lose weight! In the first eight weeks, I took off 47 pounds. Then….

Step 4: Activation
This is where the action step you chose is in full swing. You are firing on all cylinders. You are making progress, and continuing to follow the plan. You may develop a support system around you, finding strength in numbers. At this point, success becomes a self-supporting machine. It gets easy. Until…you…begin…to falter.

Maybe the action plan becomes boring. The food–the same foods every day–becomes tasteless. The bike ride becomes a chore, and now the seat really starts to hurt. You start finding reasons to skip the gym. The losses slow down, and maybe you stall. These are all the mental obstacles that pop up because you have lost the excitement of the Preparation step and forgotten the “a-ha” event that sparked your Contemplation step. This is where the support system is critical. When you find yourself standing in front of the donut display, and you are thinking “will anyone notice if I lick the display case?” you can send a text message to your supporters and gain the resolve to walk past.

But without that team effort, progress can stop. Regression begins at this point, and again, without a cast of supporting characters in your life, the regression will gain speed.

April 2009, after losing 70 pounds.

For me, this did not happen until I was nine months and 70 pounds into the plan. I just sort of stopped. I thought, “Huh. I guess I’m done now.” I didn’t know about the next step, which is…

Step 5: Preservation
I thought that once I reached my goal, I was done! But in this step, you will continue to learn new habits to lay on top of your bad habits so that you can preserve your success. That takes time. And effort. And you need to keep your focus now, just as when you were beginning your action plan in the Preparation step.

Me? Over the next eight months, I put most of the weight back on. This is not uncommon, and was another “a-ha” moment, which made me re-enter the change process at the Contemplation step and restart from there. Again, this is a common detour that many people make. And like me, many people enter into a repeating loop at this point. I restarted three additional times over the next 13 months, until May 2011 when I found the LoseIt application on my iPod. Once I had my fourth “a-ha” I found a method that has served me well into the Preservation step.

May, 2011, back up to 265. How did THAT happen???

July 2012, about six months at my goal weight, about 185. 
I am still at or under my goal, 15 months after than picture was taken.

Step 6: Termination
This step applies to many changes, but not all. If you are building your home, eventually the builders give you the keys and you move it. Or you find that your retirement fund is large enough that you can stop working, so you turn in your retirement papers and move into the next phase of your life.

Weight loss is a different change, because we keep adapting our thought process. We don’t get a hair cut just once, in the style we like and never get it cut again (unless you are my oldest son), because other changes happen around you, and your hair doesn’t stop growing. We might continue to work, even into retirement, but the definition of “work” may change.

When we reach our goal weight, the Preservation step may need to become permanent. You may need to carefully consider what you eat for the rest of your life. Or, maybe you can stop being so vigilant. We are all different. Personally, I have been at or under goal weight for 19+ months, and I still measure my food and log everything I eat. It is not a burden, so I have no issues continuing. And my LoseIt app is my security blanket. I know that as long as I am able to log my foods, I can keep the weight off. I worked too hard to go backwards. Might that change? Probably. But I am in no hurry to move to the true Termination step.

Where are you? How many times have you looped back? We need to always remember that restarting is not a failure. Failure is when you never loop back and never restart the change process.

Question: What change you working on? Where are you in this process? Give us the answer below so we can all gain more confidence and success.

Also, go to my Make Your Someday Today podcast and stay current with my changes by clicking HERE.
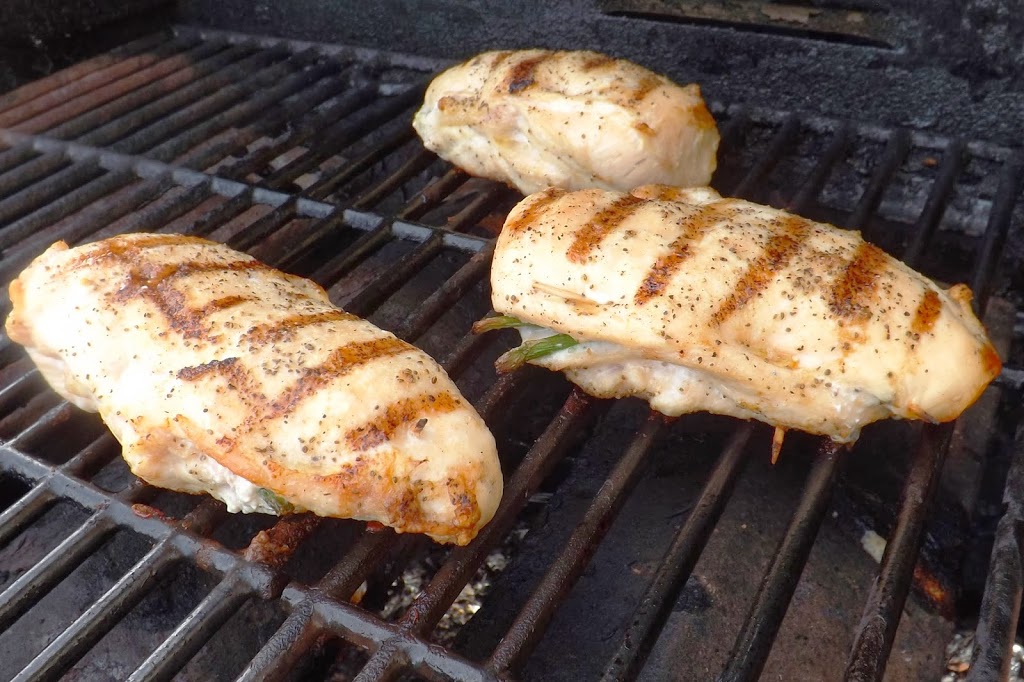
Asparagus and Bleu Cheese Stuffed Chicken Breasts


Asparagus and Bleu Cheese Stuffed Grilled Chicken Breast
Serves 4

4 chicken breasts, boneless and skinless (approximately 6 ounces each)
1 cup asparagus, cut into 1 inch lengths
1 ounce bleu cheese
1 ounce cream cheese
1/2 tablespoon olive oil
Spices and herbs of your choice (I used Penzey’s Greek Seasoning)

  1. Preheat your grill on high.
  2. Carefully cut into the side of the chicken breast, making a pocket. Do not cut all the way through.
  3. Combine the cheeses and herbs.
  4. Spread 1/4 of the cheese mixture in each pocket. 
  5. Fill the pockets with the asparagus.
  6. Use a toothpick to keep the pocket closed.
  7. Rub the chicken with the olive oil.
  8. Clean the grill’s grates with your grill brush. With additional cooking oil, a paper towel and long tongs, rub oil on the grates.
  9. Lay the chicken on your prepared grill.
  10. Let cook for 4-5 minutes, then flip and grill another 4-5 minutes.
Nutritional data:
Calories:      290
Fat:             12g
Sat fat:       4.9g
Chol:      109mg
Sodium:  176mg
Carbs:        2.3g
Fiber:         0.7g
Protein:    41.9g