Bacon-Corn Broccoli Slaw and Jalapeno-Cheddar Polenta


Bacon-Corn Broccoli Slaw 
Serves 4

2 strips bacon (reserve 3 tablespoons bacon grease)
1 cup frozen corn kernels (or the equivalent cut from the fresh cobs.)
1/2 cup diced onion
12 ounce package of pre-cut broccoli slaw

1/2 cup Greek yogurt
3 tablespoons cider vinegar
1 tablespoon ranch dressing
1 teaspoon your preferred herb blend (I used Penzey’s Sunny Paris.)

  1. Fry bacon until crisp. Remove from the pan. Chop into a smallish pieces.
  2. Add corn and onion to the pan. Over medium heat, saute until the corn begins to brown (5-6 minutes.)
  3. While the corn and onions caramelize, mix yogurt, vinegar, ranch dressing and herb blend together. Taste, and add salt, pepper or sugar to taste.)
  4. Put broccoli slaw mix in a bowl. Top with yogurt dressing. Add corn and onions, and bacon.  Toss to coat. 
  5. Serve warm or cold.
Nutritional data: (6 ounces by weight per serving)
Calories:         129
Fat:                   7g
Sat fat:              2g
Chol:           8.9mg
Sodium:      142mg
Carbs:          12.1g
Fiber:             1.9g
Protein:             5g

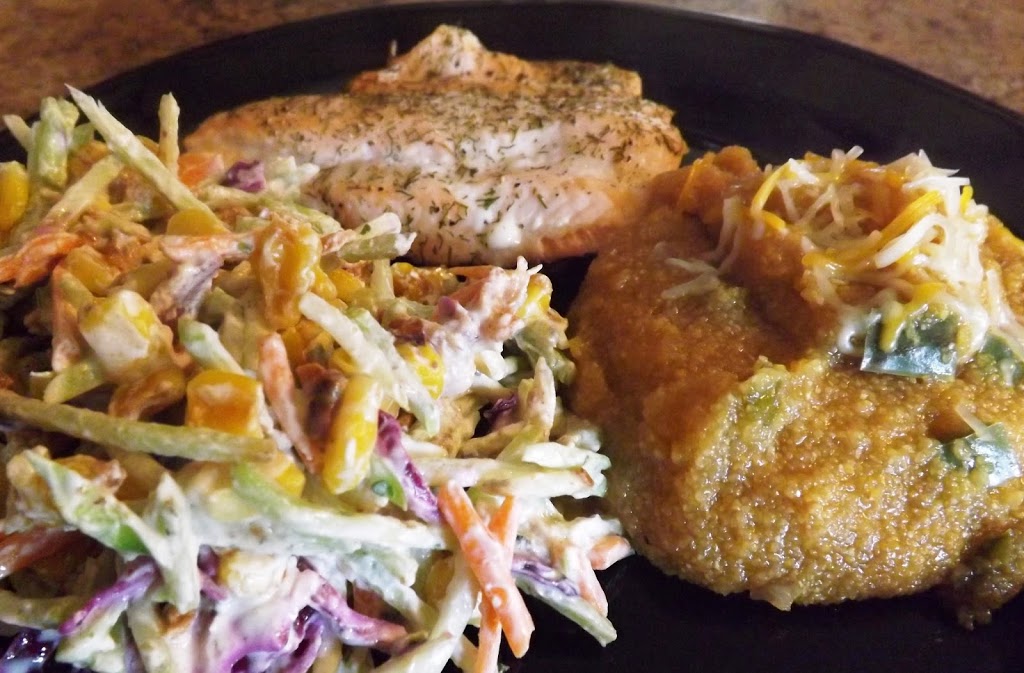
Jalapeno Cheddar Polenta
Serves 4

1 jalapeno, seeded and diced
1/2 cup onion, diced
16 ounces fluid (I used half beer, half water)
1/2 cup dried polenta
1/8 cup shredded cheddar

  1. Preheat non-stick skillet over med-high. Spray with cooking spray. 
  2. Saute pepper and onion for 3-5 minutes, until the pepper begins to get brown.
  3. While you are doing that, bring your liquid to a boil.
  4. Add the polenta to the boiling liquid.
  5. Turn heat down and cook for 5 minutes, stirring occasionally.
  6. Stir in peppers and onions.
  7. Top with a bit of cheese when serving.
(Note that my polenta is brown, but only because I used a dark beer.)

Nutritional data: (4 ounces by weight per serving)
Calories:          113
Fat:                 1.2g
Sat fat:            0.7g
Chol:            3.7mg
Sodium:      25.3mg
Carbs:           18.8g
Fiber:              2.3g
Protein:            2.8g

Homemade Pickles

Homemade Pickles
Serves: 48 spears

2-4 one quart jars with lids.

12 small pickle cucumbers (approximately 4 inches long)
1 medium onion, peeled and sliced

3 cups white vinegar
4 cups water
1 tablespoon sugar
2.5 teaspoons kosher salt
2 teaspoons black peppercorns
2 teaspoon dill seed
2 teaspoon mustard seeds
1 teaspoon celery seed
10 cloves garlic, thinly sliced

Fresh dill

  1. Wash pickles. Slice lengthwise into quarters.
  2. Wash the jars and lids, let air dry.
  3. Combine the vinegar, water, and next 7 ingredients in a 2-3 quart sauce pan. Bring to a boil, let boil for 5 minutes.
  4. While the vinegar mixture comes to a boil, pack the pickles and onions into the jars, evenly divided. (I simply used a 1 gallon jar, put the onions on the bottom and the pickle spears on top.)
  5. Cut the fresh dill into four inch lengths. Slide the dill segments into the jar, between and around the pickle spears. (Use as much as you want. More dill makes more flavor. I used most of a two foot long bundle.)
  6. After five minutes of boiling, pour the hot sauce into the jars. 
  7. Cover and refrigerate.
I based this recipe on one found in Cooking Light, adding a few ingredients and increasing the quantities of other ingredients. 
I can’t give the nutritional data for these pickles, because it would be impossible for me to measure the amount of sugar and salt that is absorbed into the pickles. And since sodium is the only nutritional concern when considering pickles, I will use the values that the magazine found when they had their pickles tested at the lab. (While I made some changes to the ingredients, I kept the same amound of sugar and salt.)
Their lab analysis shows that after 24 hours in the brine each spear had 49mg sodium and after five days, it increased to 66mg. That compares to 220-450mg per spear when you buy pickles in the store.
These pickles are not canned. They must be stored in the refrigerator, but as long as the pickles stay submerged under the brine, they will keep for a long time. (I ate a few after less than 24 hours in the bring and found them to be excellent. My wife and son agree.)

Grilled Halloumi Salad

Grilled Halloumi Salad

Serves 1

Life is busy. But that does not mean we can’t eat wonderful food!

1 ounce Halloumi cheese
1-2 cups fresh arugula
1 slice from a large tomato
1-2 teaspoon olive oil

  1. Preheat your grill on high for 5 minutes.
  2. Brush your grill and using paper towel and a tongs, wipe vegetable oil on the grate to prevent sticking.
  3. Lay the cheese on the grill. Flip after two minutes. The cheese will not melt into the grate, but will brown as in the picture.
  4. Remove after another two minutes.
  5. Lay the tomato slice on the arugula. I cut the halloumi into strips and laid over the tomato.
  6. Lastly, I drizzled some Wild Mushroom and Sage infused olive oil. (This is available from Olivada, in Sheboygan, WI.)
Nutritional data:
Calories:    162
Fat:          13.7g
Sat fat:       6.7g
Chol:        25mg
Sodium:  380mg
Carbs:           2g
Fiber:            1g
Protein:         9g
By the way, halloumi cheese originated in Cyprus, and is a blend of cow and sheep milk. It has a very high melting point because it is heated and shaped before being brined. Because of the brine, it is salty, which nicely offsets the spicy/peppery arugula. The light drizzle of olive oil is all this salad needs for a balanced flavor profile.

——————–
Make Your Someday Today is a twice-weekly podcast, where we talk to successful people in all walks of life and around the world on Monday, and then on Thursday, I take a specific message from the previous guest and give my “Trevitorial”, where I help you apply that message to your life. The entire purpose of the show is to help all of us overcome our challenges and fears and become the person we want to be, the person we deserve to be.

Kimchi


Kimchi
Make 2-3 quarts

1 head (1.5 to 2 pounds) napa cabbage or green cabbage, cut into 2 by 1-inch pieces (reserve 2-3 large leaves, uncut). Note: You can also substitute bok choy in place of cabbage.
2 tablespoons kosher salt
3 large cloves garlic, minced
1 teaspoon fresh ginger, peeled and finely grated
1 teaspoon sugar (alternatively, use 1 apple or pear).  I used 1 apple, cored, but not peeled
3 tablespoons Korean chile pepper flakes or paste (gochugaru).  I used 1 tablespoon Sriracha sauce.
4 green onions, green parts only, cut into 2-inch pieces (optional, but I used it)
1/4 cup medium yellow onion, thinly sliced (optional, but I used it)
Optional:             a few large carrots, thinly sliced (I used this)
                           1-3 teaspoons fish sauce (I didn’t use this, to reduce the sodium content)

For extra hotness: add 1 chili pepper (doesn’t need to be gochugaru).  I used a dry Thai Birds-Eye pepper, shown in the foreground.
A three quart-size, sterilized mason jars (Place in boiling water, mouth down, for 10 minutes. Do this while you are preparing the garlic-ginger-chile paste.)

Yield: 1-3 quart-size jars (I made 2 quarts from a 2 pound head of Napa cabbage.)

What to Do
Wash all vegetables and premeasure all of your ingredients so you have them ready to go. Set aside a few large cabbage leaves (to be used at the end of the process).

Place the rest of the cabbage in the large bowl and sprinkle with 2 tablespoons of kosher salt. Toss to combine. Cover the large bowl and allow its contents to sit at room temperature until the cabbage has wilted (expect this to take a minimum of one hour and as many as 12). As it wilts, the cabbage will release around a 1/4-1/2 cup of liquid. (To speed the process, place a plate on the cabbage and then put a weight on the plate. A gallon jug of water works perfectly.) Remember this could take as many as 12 hours, so give it time if it needs it! I think leaving it the full 12 hours under that plate created more juice and a better finished product.

Once the cabbage has wilted, drain it, set the liquid aside,and pat the leaves dry.

After you drained the cabbage, combine the garlic, ginger, chili pepper, carrots (if you’re using them), and sugar (or the apple or pear, if using) in the food processor or blender.


Process the mixture until it forms a rough paste (around 30 seconds if using a food processor or blender). Be sure to scrape the container’s sides as needed.

Thoroughly mix the cabbage with the paste. This is your basic kimchi mixture.

Pack the kimchi into the mason jars (try to avoid air pockets). Add equal amounts of the reserved cabbage liquid to each jar, making sure that each jar has at least an inch of head space (If needed, add some water to the jars to make sure the kimchi is completely covered by liquid.). Press the mixture down firmly using the wooden spoon, so that the brine covers the top.

Cover the top of each jar with one of the reserved large cabbage leaves.

Seal the jars loosely. (If you seal them tight, they will eventually explode.)  Let them sit at room temperature (65 to 75 degrees Fahrenheit) for three to five days. Taste the kimchi every few days; it will be ready when it has developed a sour, spicy taste and a texture resembling that of sauerkraut.  (I found that 7 days at room temperature was perfect. Also, I was out of town on days 3-7 so I didn’t really have an option. Fortunately, fermented foods are forgiving.)


When the kimchi is ready, remove the big cabbage leaves from the top of each jar and store the jars (tightly sealed) in the fridge. The kimchi should keep for several months.

Nutritional data: (1/4 cup, drained)
Calories:          17
Fat:                0.1g
Sat fat:              0g
Chol:              0mg
Sodium: 117.3mg
Carbs:               4g
Fiber:             1.3g
Protein:          0.7g

Hoisin BBQ Chicken Quarter, with Grilled Potatoes and Home Made Kimchi

Hoisin BBQ Chicken Quarter, with Grilled Potatoes and Home Made Kimchi
Serves 2

(There are many steps, but nothing is difficult.)

Hoisin BBQ Chicken
4 chicken leg quarters
Chinese Five Spice Powder
Vegetable oil for the grill

Mix together and set aside:
2 teaspoon commercially prepared Hoisin sauce
2 tablespoon sesame oil
2 tablespoon rice wine vinegar
1 teaspoon fresh minced and mashed ginger
1 clove garlic, minced and mashed

Grilled Potatoes
1 medium potato, sliced thinly
1/4 small onion, sliced thinly
2 medium carrot, peeled and sliced thinly
2 strip raw bacon, chopped
2 sheets aluminum foil each about 18 inches long
Cooking spray

Kimchi (this is a more complex–but not difficult–recipe and I will make that a separate posting)

  1. Preheat the grill on high for at least 5 minutes. Make sure that about 1/3 of your grill is only warm, to make a safe zone. (If you have a three burner gas grill, set two on high and one on low. If you have a two burner, one is high and one low. Charcoal? Most of the coals are under 2/3 of the grill and only a a couple are under the remaining 1/3.)
  2. While the grill is preheating, sprinkle the Chinese Five Spice powder on the chicken.
  3. Spray one sheet of aluminum with cooking spray.
  4. Place 1/3 of the potatoes on the sheet.
  5. Add in layers, half the bacon, half the onion and half the carrot. Season with black pepper.)
  6. Add another 1/3 of the potatoes.
  7. Add, in order, the remaining carrots, onions, bacon and potatoes. (The packet will be the same upside down or right side up.)
  8. Carefully bring the top and bottom edges of the foil together over the veggies and fold the edges together to seal. Then tightly roll the right and left edges.
  9. Place that packet on the second sheet of foil, seam side down, and repeat step 8.
  10. Note: I just saw that they now sell aluminum foil bags which would greatly simplify this part of the meal.
  11. Using tongs and a paper towel, wipe the vegetable oil on your freshly brushed grill to help prevent the chicken from sticking.
  12. Lay the chicken, skin side down, over the direct heat. Place the veggie packets near the chicken, on the edge of the hot and safe zones.
  13. Turn the chicken after 5 minutes, or if the flames of hell start to flare up.
  14. When both sides are browned (10-12 minutes) move the chicken to the safe zone. Let if cook, undisturbed, until it has an internal temperature of at least 165, but with legs and thighs, you can even go to 170 without drying the meat.  This will take 30-4 minutes.  If you don’t have a thermometer, use  a meat fork or a skewer, and pierce the thigh in the deepest part. Pull it out. If the juices are red, it is still raw. If they are clear, it is done. 
  15. Turn the potato packets 1/4 turn (flat, right edge, upside down, left edge, flat) every 10 minutes. Remove 40 minutes after putting on the grill.
  16. Remove the chicken when done and immediately brush the Hoisin BBQ sauce over it. I don’t brush this on while the chicken is still on the grill, because I don’t want it to burn, or all run off and fall into the grill.
  17. Let the veggie packets and chicken rest for 5 minutes, then serve.
Nutritional data:
Chicken (an average leg/thigh quarter will yield about 4 ounces of meat)
Calories:     210
Fat:             15g
Sat fat:        4.5g
Chol:        90mg
Sodium:  150mg
Carbs:           0g
Fiber:            0g
Protein:       19g
Hoisin BBQ Sauce (less than 1 tablespoon of the sauce–save the remaining sauce covered in the refrigerator)

Calories:       67
Fat:            6.9g
Sat fat:          1g
Chol:          0mg
Sodium:    34mg
Carbs:        2.5g
Fiber:            0g
Protein:      0.3g
Grilled Potato (half the packet):

Calories:       136
Fat:             3.7g
Sat fat:        1.3g
Chol:        9.5mg
Sodium:   133mg
Carbs:       22.1g
Fiber:             3g
Protein:          5g
In the next couple days, I will show you how to make an Asian Chicken Salad, using the leftover chicken and Hoisin BBQ Sauce.

Grilled Romaine Salad with Tomatoes and Grilled Corn

Grilled Romaine Salad with Tomatoes and Grilled Corn
Serves 2

1 heart of romaine, halved
2 ears of corn (or 1 cup frozen corn kernels)
10-12 grape tomatoes, halved
2 green onions (scallions) chopped, whites and greens
1/4 cup your preferred vinaigrette (I used the following recipe, mixed together in a jar and vigorously shaken):
           2 tablespoons olive oil
           2 tablespoons balsamic vinegar
           1 teaspoon dried herbs mixture (I used Penzey’s Tuscan Sunset.)
           1 teaspoon Dijon mustard

  1. Place the ears of corn on the grill (I prefer husks on.) Grill over direct heat until the husks are charred and the kernels are beginning to caramelize. This will take 20-30 minutes. (Keep close by the grill with a spray bottle of water unless enjoy fire.) When caramelized, remove the ears from the grill, shuck the remaining husks, and cut kernels from the ear. OR  Heat a non-stick skillet with a bit of olive oil. Place frozen kernels in skillet and saute over med-high heat until kernels caramelize. then remove from heat and cover to keep warm.
  2. Combine prepared corn and tomatoes and cover to keep warm.
  3. Brush a small amount of the vinaigrette on the cut surface of the romaine. Reserve the rest.
  4. Place the romaine on the hot grill, cut side down. Grill until slightly charred and beginning to wilt (2-3 minutes.)
  5. Place each romaine on a plate, divide corn and tomato mixture on each, and top with remaining vinaigrette. Sprinkle green onions and serve.
Nutritional data (per half):
Calories:        294
Fat:               15.2g
Sat fat:               2g
Chol:                 0mg
Sodium:           22mg
Carbs:          39.6g
Fiber:             6.5g
Protein:          6.2g
(The picture above also shows pan fried tilapia fillets.)

Sauteed Green Beans and Butternut Squash

BLOGGER STILL PREVENTS ME FROM UPLOADING PICTURES.
I will be migrating this blog to a better platform. Soon, hopefully. Please keep coming back to keep updated.

Sauteed Green Beans and Butternut Squash
Serves 4

1 pound fresh or frozen whole green beans (4 cups)
1 medium butternut squash, peeled and cut into 1/4 inch cubes (2 cups)
3 teaspoons olive oil
2 clove garlic, sliced thinly
Salt and/or Pepper

  1. Preheat a 10-11″ non-stick skillet over med-high heat.
  2. Add 1 teaspoon oil. When it is hot, add the squash cubes.
  3. Saute for 4-5 minutes, until the cubes begin to get lightly browned. Remove from the skillet, cover and keep warm.
  4. Add remaining 2 teaspoons oil to skillet. When hot, add green beans.
  5. Toss frequently, until the beans become hot and are beginning to lightly brown (4-5 minutes if fresh, 7-10 minutes if frozen.)
  6. Return the squash to the skillet. Add garlic. Toss together until thoroughly hot (1-3 minutes.) Season with salt/pepper as desired.
  7. Serve.

Nutritional data:
Calories:      64
Fat:            2.5g
Sat fat:       0.4g
Chol:            0mg
Sodium:     6.3mg
Carbs:      10.6g
Fiber:         2.9g
Protein:      1.8g

Mac ‘n Cheese, Baked

Mac ‘n Cheese, Baked
Serves 4

Note: this is not an ooey-gooey cheese-dripping version of Mac ‘n Cheese. It uses relatively small amounts of cheese, but the end result is still a rich-tasting, warm comfort food meal.

2 cups dry shell pasta (8 ounces by weight)
1/2 cup plain Greek yogurt (5 ounces by weight)
1/2 cup shredded sharp cheddar cheese (2 ounces by weight)
1/4 cup shredded mozzarella cheese (1 ounce by weight)

  1. Preheat oven to 450F.
  2. Prepare pasta according to directions on package.
  3. Spray a 1 or 1.5 quart casserole with cooking spray (makes clean up easier).
  4. Drain cooked pasta.
  5. Combine pasta and remaining ingredients. Add to casserole.
  6. Bake uncovered, until the cheese melts and gets browned (about 10-15 minutes).

Nutritional data:
Calories:        301
Fat:               6.5g
Sat fat:          3.3g
Chol:             19mg
Sodium:       145mg
Carbs:         43.9g
Fiber:               2g
Protein:       15.6g

As I served it with my Roasted Carrots and Peas.

Bacon-Spinach Mashed Potatoes

Bacon-Spinach Mashed Potatoes
Serves 6 (approximately 1/2 cup or 4 ounces by weight)

3 medium Yukon gold potatoes, peeled and quartered
1 teaspoon olive oil
3 cloves garlic, smashed and minced
1/4 cup (2.5 ounces by weight) Fage Greek yogurt
2 tablespoon real bacon bits (or 1-2 strips, fried and crumbled)
4.5 ounces (by weight) baby spinach, torn

  1. Place potatoes in small pan, covered with water and bring to a boil. Boil until the potatoes are soft, and easily pierced with a fork (8-10 minutes–small dices cook faster).
  2. While the potatoes cook, heat a large (10-12 inch) non-stick skillet over medium high heat with the olive oil.
  3. When the oil is hot, add the garlic. Let it saute for 1 minute, then add the spinach.
  4. Turn the spinach frequently. It is finished when it wilts completely. Remove from the heat.
  5. When the potatoes of cooked, drain and place potatoes in a deep bowl.
  6. With an electric mixer, whip the potatoes. Add the yogurt and bacon bits.  Mix well.
  7. Stir in the spinach and serve.

Nutritional data:
Calories:      93
Fat:            1.6g
Sat fat:       0.5g
Chol:         1.7mg
Sodium:      88mg
Carbs:        17g
Fiber:        1.6g
Protein:     4.7g

Roasted Vegetables:
Choose your preferred veggies (I used fresh crimini mushrooms, bell peppers, Brussels sprouts, and onions.)
Wash all veggies, and lay in a 9×13 pan. Drizzle 3 tablespoons olive oil evenly. Sprinkle with your favorite herbs and spices.
Roast at 450 for about 30 minutes, stirring every 10 minutes.

Nutritional data will vary with your veggies choices. Other options include adding baby carrots, zucchini, butternut squash cubes, potato cubes, cherry tomatoes, whole garlic cloves.

Roast Beef:

Let the roast rest at room temperature for 1-2 hours. Season it as you prefer.
Preheat oven to 325.
Place the roast in a pan.
Bake uncovered, 30 minutes per pound (for medium) or until an instant read thermometer reads 150.

Take it out of the oven, and cover loosely with foil. The roast will continue to cook for another 15-20 minutes.

Roasted Carrots and Peas

Roasted Carrots and Peas
Serves 6

6 large carrots, peeled, and cut in quarters lengthwise
2 cups frozen peas, thawed
1 tablespoon olive oil
Seasoning (black pepper, coriander, garlic powder, onion powder is what I used)

  1. Preheat oven to 450 and place a baking pan in it while heating.
  2. Place carrots in a Ziploc baggie.
  3. Top with olive oil and seasoning. Toss to coat.
  4. When the oven is hot, put the carrots in the hot pan.
  5. Roast for 25 minutes.
  6. Add peas, mix together. Roast another 10 minutes.

Nutritional data:
Calories:   79
Fat:           2.7g
Sat fat:      0.4g
Chol:           0mg
Sodium:  90.3mg
Carbs:     11.9g
Fiber:        3.7g
Protein:     2.9g